When heated above 250°f (121°c) the end caps. The bare copper wire must be completely inserted into the connector.
Buy 30 Pcs Electrical Cable Connectors Quick Splice Lock Wire Terminals Self Locking At Affordable Prices — Free Shipping, Real Reviews With Photos — Joom
During cable splicing, the wires of different length are joined together while their original characteristics remain the same.
Protect electrical splice wire caps. Tug on the wire to. They are available in many different sizes to accommodate and protect your cables and wires, and they are. Strip approximately 6 inches of the outer plastic sheathing from the end of the wires you’re splicing together.
Instruction on the proper way to splice wires using a wire nut connector. Look through the clear end or window of the connector to confirm the wire is fully inserted. In 404.14 (c) and 406.2 (c), the code requires you to use terminals and splicing devices identified for use with the conductor material.
Strip about 1/2 to 3/4 inch of insulation from the end of each wire, using a wire stripper. They can be used in a wide variety of applications, including cars, electrical work, and networking. Click to see full answer.
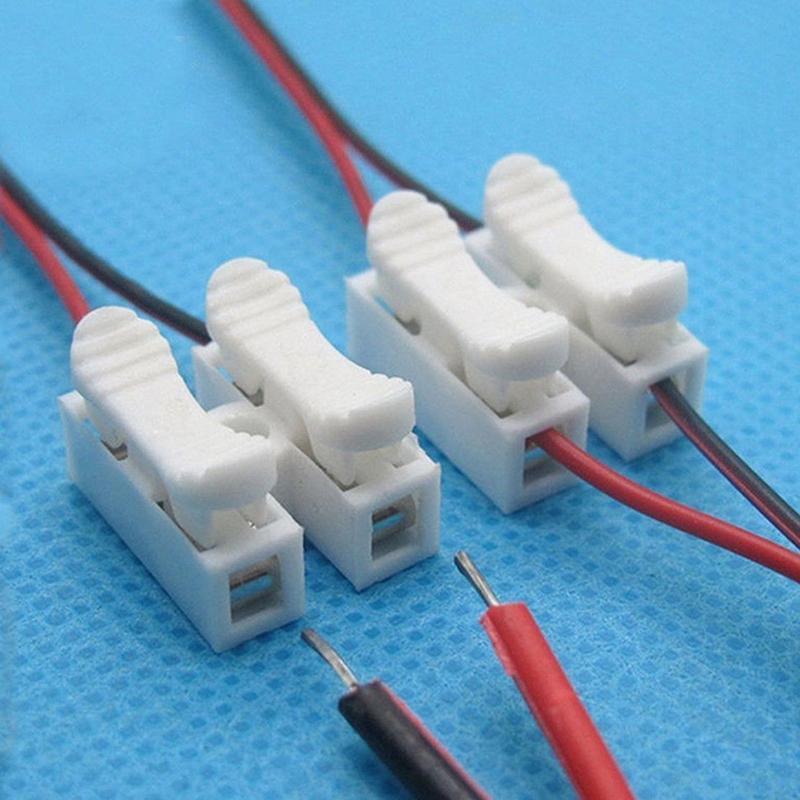
Be sure to use the right hole in the stripper so that you don't cut into the metal of the wire. Push each wire into one of the open ports, pushing as far as it will go. Once your wires are connected to one another, cover the exposed ends with electrical tape or shrink tubes and they're ready to use!
Next, twist the wire cap clockwise on top of the exposed wires. The heat shrink end caps are highly resistant to moisture, fungus and weathering. Cable or wire splicing is the process of connecting the endpoints of two or more cable conductors.
In stock and ready to ship. Rotate the cap clockwise for approximately five seconds. Terminals listed for aluminum typically have an antioxidant to reduce aluminum oxide, which reduces the conductor/terminal contact.
Connect the pulling rope to the cable grip using shackle and provide signal on other end of. 1 thumb and 1 finger per hand. Take a piece of 8mm shrink tube about 3 inches long, and slide it down one side of the wire bundle.
Once wires are stripped, take a 1/2 inch piece of 3mm heat shrink tubing and place one section over each individual wire. (don’t forget this step, or you’ll regret it after you’ve finished the splice.) 3. Heat shrink insulating caps specifically designed to insulate, seal and protect end or stub splices in wiring harnesses and electronic assemblies.
Polyolefin heat shrinkable end caps are engineered to seal electrical wiring and cable ends while providing mechanical and environmental protection. Slide a piece of shrink tubing over the wire you’re splicing as you’ll need it once you complete the. Remove any damaged areas before you begin splicing.
N mechanically tough jacket splice. This will coat the connection and cover the. Benefits n 4:1 shrink ratio allows a few sizes to cover a wide range of splice and component diameters.
Fit the appropriate size of wire nut over the wire ends and push into the wires while twisting the nut. After this, tug on the wires to make sure they stay in place. Use lamp cord (18 awg).
Our electrical end caps are also available with. Insert wires and twist on the threaded end caps. Strip and ground the wires.
Butt splice crimp connectors kit: Hemostats or needle nose pliers and maybe some gloves (see below) wire stripping utensil. Install the cable roller on the cable tray on the entire cable laying area.
Heat shrink end caps insulate and seal off wire and splice terminations to protect against the elements, chemicals, abrasion, and more. Look for burnt wire insulation, cut wires, nicks, or bite marks. To do this, set the wire cap on top of the exposed wires and start twisting.
Insulating material (heat shrink tubing recommended) With the electrical wire stripper, cut off any bare ends of wire down to the wire coating to tidy them up. The wires should coil themselves inside of the cap.
Teach them the western union/lineman's splice add tinning to make it stronger test what's stronger: Terminals and splicing devices suitable only for aluminum must be marked al. Then, remove about ½” of the plastic sheathing from the individual copper wires.
Insulate/protect it with electric tape shrinkwrap show the how to tie/splice the end for a dipole antenna build/raise. Hold the wires together, so their ends are aligned. Inside the heat shrinkable tubing is an adhesive liner that will melt when heated.
Caps slip over wire and stay in place until you pull them off. Prepare the bare ends of the wires. Examine the wiring for signs of damage.
Cover live wire ends with insulated plastic caps that protect against shock from accidental contact. Provide cable roller interval at 3 meters for straight run and corner cable roller on every change in direction. Splicing is the process of combining 2 lengths of wires so they can carry a current.
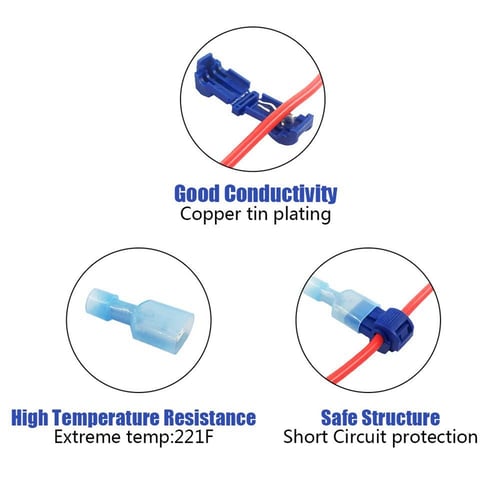
There are many ways to splice wires together, from simply using wire caps to soldering them together. Filled with silicone, these connectors seal out. They are tested to 1, 000 volts to meet iec 60900 and astm f1505.
Strip the plastic coating off the ends of the wires. When managing the electrical project, you will often find a need to splice electrical cables instead of buying new ones. The splice or the wire.
Make sure this fits by entering your model number.;
Do not enlarge or distort the port. Do not wash burner caps in the dishwasher.

Amazon.com: Kitchenaid 30" Stainless Steel 5-Burner Gas Cooktop Kcgs550Ess : Appliances
This type of ventilation system may cause ignition and combustion problems with this gas cooking appliance resulting in personal injury or unintended.

Kitchenaid gas cooktop ignition wire burned. If a gas leak is detected, follow the “what to do if you smell gas” instructions. Usually, this is a problem that can be solved with cleaning. Should you notice sparks from your electric unit, you definitely need to make some repairs.
Disconnect all the wires attached to the spark module. When the cooktop lock activates, the cooktop lock indicator light will turn on and one. If playback doesn't begin shortly, try restarting your device.
The cooktop lock feature helps control the unintended use of the surface burners. An electric cooktop should not spark the same way that a gas cooktop does before it’s lit. Remove the bushings from the stems of the burner control valves.
Before removing the burner cap or burner base, make sure the gas stove top is cool to the touch and the appliance is unplugged. Videos you watch may be added to the tv's watch history and influence tv recommendations. The burner base and the underside of the burner cap may have a mark indicating which burner cap and burner base match as shown below.
In some models, you will also need to remove the igniter electrode that is built into the burner head. Remove the burner cap and burner base. Burner cap should fit flush with burner base and have very little side to side movement.
Turn off all burners and touch the lock key for 3 seconds. Do not clean in the dishwasher. The indicator light will turn off, and one long tone will sound.
When the cooktop lock activates, the cooktop. Spark ignition switch wire harness for kitchenaid kfgu766vss04 cooktop. Gas cooktop use and care guide for questions about features, operation/performance, parts, accessories or service, call:
Making sure the alignment pins (if present) are properly aligned with the burner cap as shown below. Cooktop creates sparks when turned on. For some burner bases, you may need a screwdriver to remove the screws.
Gas burners and ignition for your kitchenaid cooktop. Serving only this cooktop be provided. However, when food or other debris burn up in a gas flame, it changes the color to yellow, orange, or red.
This type of ventilation system may cause ignition and combustion problems with this gas cooking appliance resulting in personal injury or unintended. Always keep the burner cap in place when using a surface burner. A clean burner cap, especially the bottom of the cap, will help avoid poor ignition and uneven flames.
Click here for a video about how to properly position your gas burners and bases. Remove the switch and harness assembly from the cooktop and discard it. Touch the lock key for 3 seconds.
If a control knob is turned to lite when the cooktop lock is on, you will hear clicking and you may see the igniter sparking, but the burner will not light. Common induction operating sounds using correct cookware. Some of these conditions are dangerous.
Electronic ignition systems operat e within wide voltage limits, but proper grounding and ipolarity are necessary. To activate the cooktop lock: This article explains the cause, diagnosis, and cure of cooktop or gas range igniter problems that cause continuous clicking, or failure to ignite gas burners or a gas oven properly.
Gas cook top igniter diagnosis: Do not use a wooden toothpick; Spark ignition switch wire harness for kitchenaid kfgu766vss04 cooktop.
Clean the gas tube opening under the base. The wiring diagrams lpare provided with this cooktop. Doing so may result in carbon.
The cooktop is easiest to clean as soon as the top, grates and caps are cool following cooking. To deactivate the cooktop lock: To remove the burner head for cleaning, you simply need to unscrew the mounting screws and remove it.
Then, simply remove the grates and lift the cap off of the burner. Before removing your burner head, you will want to shut off the gas to your stove and disconnect it from its electrical source for safety. Watch the following video to learn about your gas surface burners:
Gas burner flames are too high or low, uneven, flickering, yellow, or noisy on your kitchenaid cooktop. If the wire harness and switches are one component, as on this model, remove all. Never use this appliance as a space heater to heat or warm the room.
The gas igniter troubles discussed here apply to some models of gas appliances including gas stoves, gas ovens, and gas cooktops. If your gas burner flames are not normal, check to make sure the burner ports are clean. Turn off all burners and touch the lock key for 3 seconds.
Models/modèles kgrs807 kgsk901 kgss907 w10246109b gas range architect® series ii use & care guide for questions about features, operation/performance, parts, accessories or service, call: Do not install a ventilation system that blows air downward toward this gas cooking appliance. Genuine product, whirlpool manufactured the original product for your kitchena.
Click here for a video about properly cleaning your gas surface burners. The final issue that can occur with the flame on your gas stove is that the flame will be yellow instead of blue. Pull the spark igniter switches off of the burner control valves.
Table de cuisson au gaz guide d’utilisation et d’entretien Do not install a ventilation system that blows air downward toward this gas cooking appliance. Always clean the burner cap after a spillover and routinely remove and clean the caps.
Clean with a nonabrasive plastic scrubbing pad and mildly abrasive cleaner. Electric ignition on your kitchenaid gas cooktop. Do not use a wooden toothpick, it can break off and prevent proper gas flow.
If a gas leak is detected, follow the “what to do if you smell gas” instructions. To reduce the risk of fire, electrical shock, injury to persons, or damage when using the cooktop, follow basic precautions, including the following: Genuine product, whirlpool manufactured the original product for your kitchenaid kfgu766vss04.
If your electric cooktop produces sparks, there may be damage to its heating element. Its possibly one of the burner switches came out of place, remove all the knobs and get a flashlight and see if they are all aligned with the valve stem properly.
Section r312 landings r312.1.11 landings for stairways: Stair landing should be provided at the top and bottom of each flight of exterior and interior stairs.

Stair Internal Handrail Transitions Over Intermediate Landings
For outdoor landings, balconies, porches or decks it’s necessary to have a minimum height of 36” inches for guardrails when a drop off is more than 30” inches in height.

Handrails on stair landings. Minimum & maximum ii.variation b. • all interior and exterior stairways shall be provided with a means to illuminate the stairs, landings, and treads. Place each one one foot off the center.
Doors opening onto a landing cannot reduce the minimum landing width to. Landings and steps that pass underneath the floor of the deck must maintain 6′ 8″ headroom. Fast tread® preformed stairs handrail & stair compliance guidelines 1.
R408.30517 r312.1.2 landing at doors: The height between the lower slab/landing (a) and the upper deck/landing (d) is 58 inches. Handrails for stairs with one side against a wall.
There are no requirements for landings at any interior door except adjoining stairs. Stair landings must be as wide as the stair served and 36 inches measured in the direction of travel. • interior stairways o artificial light source located in the immediate vicinity of each landing of the stairway o capable of illuminating treads and landings not less than 1 foot candle (11 lux) o wall switch required at.
What are the cases in which stair landings are needed? If there is more than 12′ from the deck to the ground, then there must be additional landings. Landings of staircases are required at the top and bottom of every staircase.
The top rail must be at least 42 inches in height (§1910.29 (f) (1) (ii) (b)) and the handrail must be 30 to 38 inches in height (§1910.29 (f) (1) (i)) (as measured at the leading edge of the stair tread to the top surface of the rail). It's vital to note that osha standards are prone to change. With the help of the members of nadra, the 2022 edition of the international residential code (irc) is now officially complete and ready for printing.
Anyone climbing or going down the stairs should be able to hold the handrails firmly. Additionally, the maximum vertical rise of a staircase is 151 inches (12. Accept the other default input values and press calculate stairs.
• the minimum clear width from the handrail height to the treads is 31 ½ inches for stairs with rails on one. We provide building stairway codes that specify the size and placement requirements for safe, accessible stairway landings & platforms. At or below the handrail height.
Stair landings landings for stairways r311.7.6. Minimum & maximum length b. A powder coated or galvanized steel handrail is a popular choice for prefabricated industrial stair applications where other components of the stairs are made of steel.
For stair rail systems installed on or after january 17, 2017, the top rail and handrail must be separate. The landing width must be the same as the perpendicular staircase preceding the landing. We show examples of breaks in the handrail and discuss.
Landings (ibc 1011.6 & 1009.6.3) there must be a floor or landing at the top and bottom of each stairway. The depth of the landing perpendicular to the preceding staircase must either be the width of the following staircase or a minimum. The osha standards specify that the top rail and handrail should handle a weight of a minimum of 200 pounds in any direction.
The width of landings must be as wide as the stairways that they serve. The results from the stair calculator indicates that the typical step height is 7 1/4 inches, and a total number of 8 steps (risers). Stair guards do not protect stairs but are often used in conjunction with stairs, as with stair landings or.
• the minimum clear width from the handrail height to the treads is 31 ½ inches for stairs with rails on one. By contrast, stair guards run horizontally along a flat area, with a drop on the other side. 1910.25 (b) (2) vertical clearance above any stair tread to any overhead obstruction is at least 6 feet, 8 inches (203 cm), as measured from the leading edge of the tread.
A stairway between the garage and dwelling is defined as an interior stairway. On the other hand, the landings are made of 12”x24” idaho quartzite. Stair railing and stair guards, though they may sound like the same thing, are different.
Stainless steel handrails can be used with railings made of other materials, like glass. For stairways with straight run that have an overall rise greater than 3. See pictures of stair railings including contemporary, traditional, rustic & modern designs.
Stair landing is needed where a doorway at the top of stair flight swings toward the stair, figure 5 and figure 6. If you are mounting handrails by the bottom of an open staircase that’s 10” deep, then the. This ensures that the internal handrail transitions around over the landing and maintains a consistent height.
Enter this number in the total rise field. The landing must be bolted to the deck. At the top of an interior flight of stairs, if a door does not swing over the stairs.
A landing is not required at the top of In this contemporary exterior house, there are front stairs that are made of bluestone. Handrailing continuity where are breaks permitted in handrailings?
The arc force mezzanine and stair handrail system is the most innovative one on the market. At the top and bottom of every staircase, there needs to be a landing or floor. There shall be a floor or landing at the top and bottom of each stairway.
This article explains and illustrates the requirements for continuously graspable handrails on steps and stairs, at landings, and at other locations inside or outside buildings. 1910.25 (b) (1) handrails, stair rail systems, and guardrail systems are provided in accordance with § 1910.28; Spiral stairs must meet the.
Stair landings are required at top and bottom (with exceptions at top of interior stairs or in garage if door swings in, away from the stairs), and the stair landing must extend no less than three feet (>= 36. Where the stairway has a straight run, the landing does not need to be more than 48 inches deep. H drive/ team/ inspections/ handouts/ residential stairs, landings, & guardrails 03/15/2022.
The new codes require that the width of a staircase can be no less than 36”. The step treads are made of connecticut bluestone cut in long slabs, the same with the perimeter stones on the ladings and the porch (but in 12” x24” version). Whether it be the stair, rails, or landing, follow along as we explore the new building codes for 2022.
If a staircase has two handrails, one on both the right and left sides, the stairs above the handrail height must be a minimum of 27 inches wide. For a 36″ wide landing, two bolts will do fine. For homes and commercial spaces, stainless steel handrails provide a sleek, modern look.
In other words, you should ensure the surface of the tread isn't slippery. Stair railing runs on the stair incline, up and down. Guide to stair railing ideas for interior designs.
This handout is intended only as a guide and is based in part on the 2020minnesota state building code , blaine city ordinances, and good.
So, find out the suitable point of space where you want to install the fan. However, you can install it.

Jual Exhaust Fan Kitchen Murah & Terbaik - Harga Terbaru June 2022
A single exhaust exits through the roof (figure a).

Can two exhausts fan be used in the kitchen. Many hoods are simply installed too high and this drastically reduces their effectiveness. Using the template that came with your fan, cut into the drywall using a saw or drill. The cooking process often creates both visible particles as well as an invisible aerosol mist of grease and smoke.
Depending on your kitchen size, it can be two or three to make the environment normal. There are a number of exhaust fan accessories that can be added to a standard exhaust fan to improve performance and assist with maintenance needs. A range of 100 to 400 cfm is fairly broad, so more guidelines are needed to determine the proper size for a vent fan.
You mount a switch in each bathroom. Grease can and does coat the surfaces of your kitchen if they're not. A grille in each bathroom attaches to ducts, which then fasten to a “y” connector at the fan.
Air king window fan is an effective solution for ventilation and effective air circulation as it helps to keep your kitchen or room, fresh and cool. Use more than one fan in your kitchen instead of one. It can ventilate the smoke and cooking odor from the home.
Adjust the fan in the right place. Because the fan is in the attic, you’ll hardly hear it. They get rid of the moist air and odors that arise when cooking.
The rest of this article will explain the. Not the flexible metal ducting but the smooth metal. The more air that is in this system, the greater the load (static pressure) on the fan.
The pljw 185 under cabinet range hood is the best residential kitchen exhaust fan on the market. The above scenario will work provided the following: There are two main types of fans used in kitchen exhaust applications.
And you just don’t want to mix that in with the bathroom ventilation. Steps for fitting a kitchen exhaust fan: Using your pipe as an outline, cut out a vent in your outside wall.
For room up to 170 sq. The benefits of kitchen ceiling fans include: They circulate stagnant air around the kitchen.
If you use a recirculating fan, replace or clean the filter regularly. And realize that although these filters are good for capturing grease, they really aren't accomplishing much in terms of air pollution. I called nutone and they recommended i get one of their utility fans suitable for a kitchen and made to be ceiling mounted.
Keeping your kitchen exhaust fans maintained and in good working order is important to avoid serious problems like negative pressure, backdrafting, and buildup of deadly fumes. The official requirement for a kitchen vent fan is that it must move a minimum of 100 cfm and no more than 400 cfm unless there is a method of introducing makeup air to replace the exhausted air. When inline fan is in operation, air from both washrooms will vent out.
The stainless steel push buttons are easy. This duct may be short, long or have a number of bends. So two exhaust fans would be double the materials cost, so it would likely be between 400 to 600 dollars.
Keep in mind these prices are if you’re going the diy route. You can replace the fan opening with a grill for each washroom. Discussion starter · #7 · oct 2, 2008.
This system is quiet, too. Between the fan blades and the exterior of your home (end of the duct) lies a volume of air (the calm air in the exhaust duct). After turning off the electricity, mount your.
Available in 5 sizes in white color. Measure 24 to 30 inches above your kitchen range for the placement of the hood range fan. Below are the steps to install a ductless exhaust fan.
Fans for kitchen exhaust need to be rated for handling grease laden air. Select the best rightful heightened place to install your kitchen exhaust fan. Installing a single bathroom exhaust fan can cost you between 200 to 300 dollars in materials alone.
However, kitchen exhaust fans play a role in maintaining indoor air quality and, to some degree, protect the health of the occupants of the house. In terms of the kitchen vent, that i would keep separate because that could potentially be greasy. Efficient dual blowers pull 600 cubic feet per minute (cfm) of air to keep your kitchen air clean and fresh.
Without proper place, air cannot exhaust in and. Then add an 'inline fan' to the remaining leg of the y adapter and run ducting to vent outside. They remove cooking smells from the kitchen area.
Yes, the exhaust fans do exhaust grease vapor. Not too bad at all in my opinion. Both washrooms must have nearly identical square.
The main determining factors in fan selection are cfm need, total system static pressure, noise volume and discharge preference. For pm 2.5, the effect of running an exhaust fan for 15 min after cooking was similar in magnitude to the. This broan 509 exhaust fan is made up of good quality plastic.
If you want to use a bathroom exhaust fan in the kitchen, then there are a few facts you should follow. The results showed that while leaving the fan on after cooking generally increased decay rates, it had a relatively small effect on integrated exposures compared to the effects of fan flow rate and the specific fan used during cooking. 180 cfm and has a 7.5 sone.
At just five inches tall, this under cabinet hood packs a powerful punch. Employing a contractor to do this job would cost you much more. Think of the fan and duct assembly just before the fan turns on.
The ideal size for exhaust fan installation is considered at an altitude of 36 inches. Ceiling fans keep your kitchen at a temperature that’s comfortable for everyone. Appropriate fans will have a ul 762 approval and listing.
Caulk the vent cap and place it on the exterior wall. I picked one up today at home depot for 89 bucks, plus another $7.50 for the grease filter. The constant rotating movement keeps flying insects such as flies, away.
Turn on your exhaust fan every time you cook.
One of the valves controls the amount of hot water entering the radiator and the other (known as the lockshield valve) balances the system by controlling how much heat the radiator emits. Central heating controls used to be relatively simple.

Tuya Thermostatic Heating Radiator Valve Head Controller Radiator Actuator Smart Thermostat App Remote Control Tuya Smartlife Alexa Acho Google Home Smarthome - China Trv Tuya, Zigbee Thermostat | Made-In-China.com
More on lockshied valves… the lockshield valve tends to be covered with a plastic cap.

Radiator heating controls. Radbot smart thermostatic valve, head only. I would like each zone to be individually controlled via a heatmiser solution. For people who live in a home that uses a radiator, they might wonder how to alter and control the temperature while inside of the house.
A lockshield valve is a type of valve that is fitted onto every radiator at the side where the water flows into the radiator from the boiler. Otherwise, if the radiator is partially warm, check for air in the system. There was a thermostat to control the temperature, a programmer to set the times and a hot water stat to control the cylinder.
A screed underfloor heating system will. Radiator valve inspection & troubleshooting: Installing heating controls to your home heating system will typically reduce your energy usage by up to 20%.
Electronic control and regulation consists of room thermostats and communication modules to control your heating and cooling, see your energy use and status. This works by switching off the boiler and central heating once the ideal room temperature is reached. With the right control and regulation, comfort is maximized while energy use can be controlled and minimized.
These heating systems can be controlled with one of the following setups: I have a boiler connected to a megaflow and 6 radiator zones. Salus smart home electric smart plug for it600.
The complete house is heated based on the temperature measured by the smart thermostat. Smart radiator thermostats can also be added to allow for heating control in individual rooms. For 75 years, we have been the market leader in automatic heating control technology, ensuring comfort for families and 43 millions european homes.
Check the thermostatic valves on the radiators are turned up, the room thermostat is turned up, the time controller is on , the boiler is on and the system is up to pressure ( if applicable). If the radiator has a trv try turning it up. One controller can control several radiators although we recommend different controllers for different.
Control temperature with programmable and electric room thermostats. Each radiator in your home needs a pair of radiator valves. According to energy saving trust, those savings could, on average, amount to £60 and 310kg of carbon dioxide each year (based on installing and correctly using a programmer, room thermostat and thermostatic radiator valves).
Smart heating controls can save you money in the long term and reduce your impact on the environment. Room thermostats and time controls; If you're thinking about having a new central heating system or boiler installed, corgi homeheat, part of the ovo family, can take care of everything.
The purpose of the lockshield valve is to help regulate the heat output of the radiator itself, and to allow for a heating engineer to balance the radiators so that all the radiators in the heating system output heat at around the same rate. Home heating systems without heating controls can be wasteful of energy and costly to run because there is little to no control of the amount of heat being used to heat your home and your hot water. One wired smart thermostat controls the boiler.
What to do about hot water or steam radiator valves or vents that are stuck open or closed. In this article series we explain the use, adjustment, diagnosis & repair of hot water or steam heating radiator valves & steam vents to control heat output from individual radiators. From whole smart heating systems, right down to the.
Adding modern heating controls can help Because of this, screed underfloor heating should be turned on around an hour earlier than an equivalent radiator system. With our new smart heating solution, danfoss ally™ you get full control of your radiator and hydronic floor heating.
At uk radiators, we supply a range of heating controls to help you maintain and operate your radiators. A system with one programmable thermostat is called a single control zone with slave thermostats on the radiators. The water is boiled in the boiler and water heater, then pushed through the house.
And, a bit later on thermostatic radiator valves to control individual. This is the most common way to control radiator central heating and gives great control and convenience. The boiler timer is also useful for this, so you can set an ideal hour for radiators or water to heat up.
Get your fixed price online in just 80 seconds and choose an installation date to. Ensure energy savings and room by room comfort in radiator heating systems with our radiator thermostats and room thermostats. Radiators allow for the flow of hot water to provide heat to the metal gratings in the different rooms.
Radiator sensors, radiator valves and dynamic valve, electronic radiator thermostats. Keen to understand how each of the individual thermostats (neo stat) will tell each individual radiator valve to open and close deepening on the temperature required. The second type of temperature control is the room thermostat, which you can use to control the home’s temperature.
With smart heating controls such as the salus smart home collection, you can use salus controls with your compatible radiators to keep your home nice and cozy, the way you like it.
Make sure you have the right breaker before getting started! Bring a small lamp or other electronic device around with you so can quickly test outlets.
How To Buy Electrical Panels
Test the circuit breaker with a multimeter.
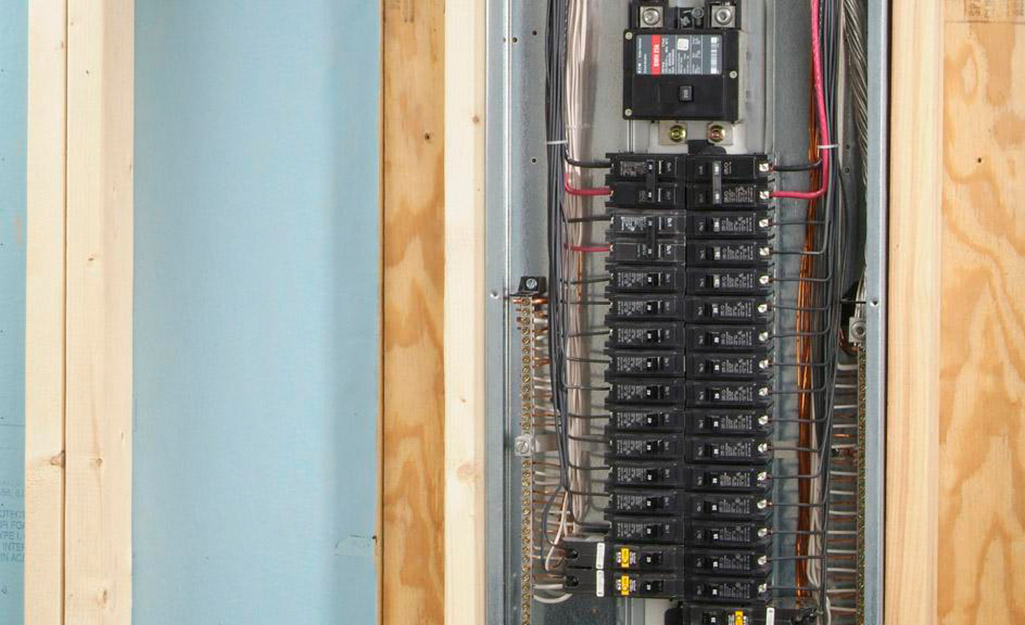
How dom yuo determine poles on a electrical panel. From here, power is distributed to subpanels and circuits throughout the house. Open the cover of your breaker panel. If the size of your panel is much smaller than your electrical needs, it can be.
Walk through your house to check for lights and outlets that still work. Service meter bases are typically rated the same as the meter. In general, any electrical panel that has 0 to 150 volts going through it needs to have at least 36’’ of clearance around it.
The average lux level of street light is measured by 9 point method. Once electricity is carried beyond your meter, it is distributed to lights, receptacles, and appliances throughout the house by several different electrical circuits. To determine this rating, read the sticker on the side of the meter.
This means you cannot place machinery or other equipment in the space around an electrical panel without making sure that it meets the nec working clearance requirements. A 30/60 circuit panel has 30 spaces, 15 on each side for breakers. 3 signs of a faulty circuit breaker.
The part of the circuit that draws power from the source. It does to a sub. On the lane of light poles ( one side pole to road).
It is usually at the bottom of the panel. The rated speed of the motor is mentioned in rpm. How to tell how many poles a motor has.
We have 3 points p1,p2 and p3 under the light pole then p4 & p7 are points opposite pole 1 or point p3 same is applicable for p6 and p9 for pole 2. Add them all and get the load limit of the circuit breakers. Repeat this process with each switch.
The most common function of the electrical panel box that people are generally aware of is the ability to switch a breaker or replace a fuse in case it’s tripped or blown. Move the compass around the inside of the stator. • main bonding jumper (install or not?) the main bonding jumper gives you system grounding.
Typically, one panel feeds the entire house, but there can also be another, smaller panel, called a subpanel, which may be used to serve a specific area, such as an addition, a large kitchen, or a. 1 tools and materials required for the task. Panels with 151 to 600 volts should have 42.
The number of circuits and breakers you can install in an electrical panel is limited by the panel’s design. Stephen, a handyman from banner, wy, usa. This electrical question came from:
Most 200 amp panels will have 40 breaker slots but can accept more circuits with tandem breakers. The electrical meter is mounted at the main electrical panel. In order to find out the synchronous speed roundup the values mentioned on the nameplate to the nearest value in the table below:
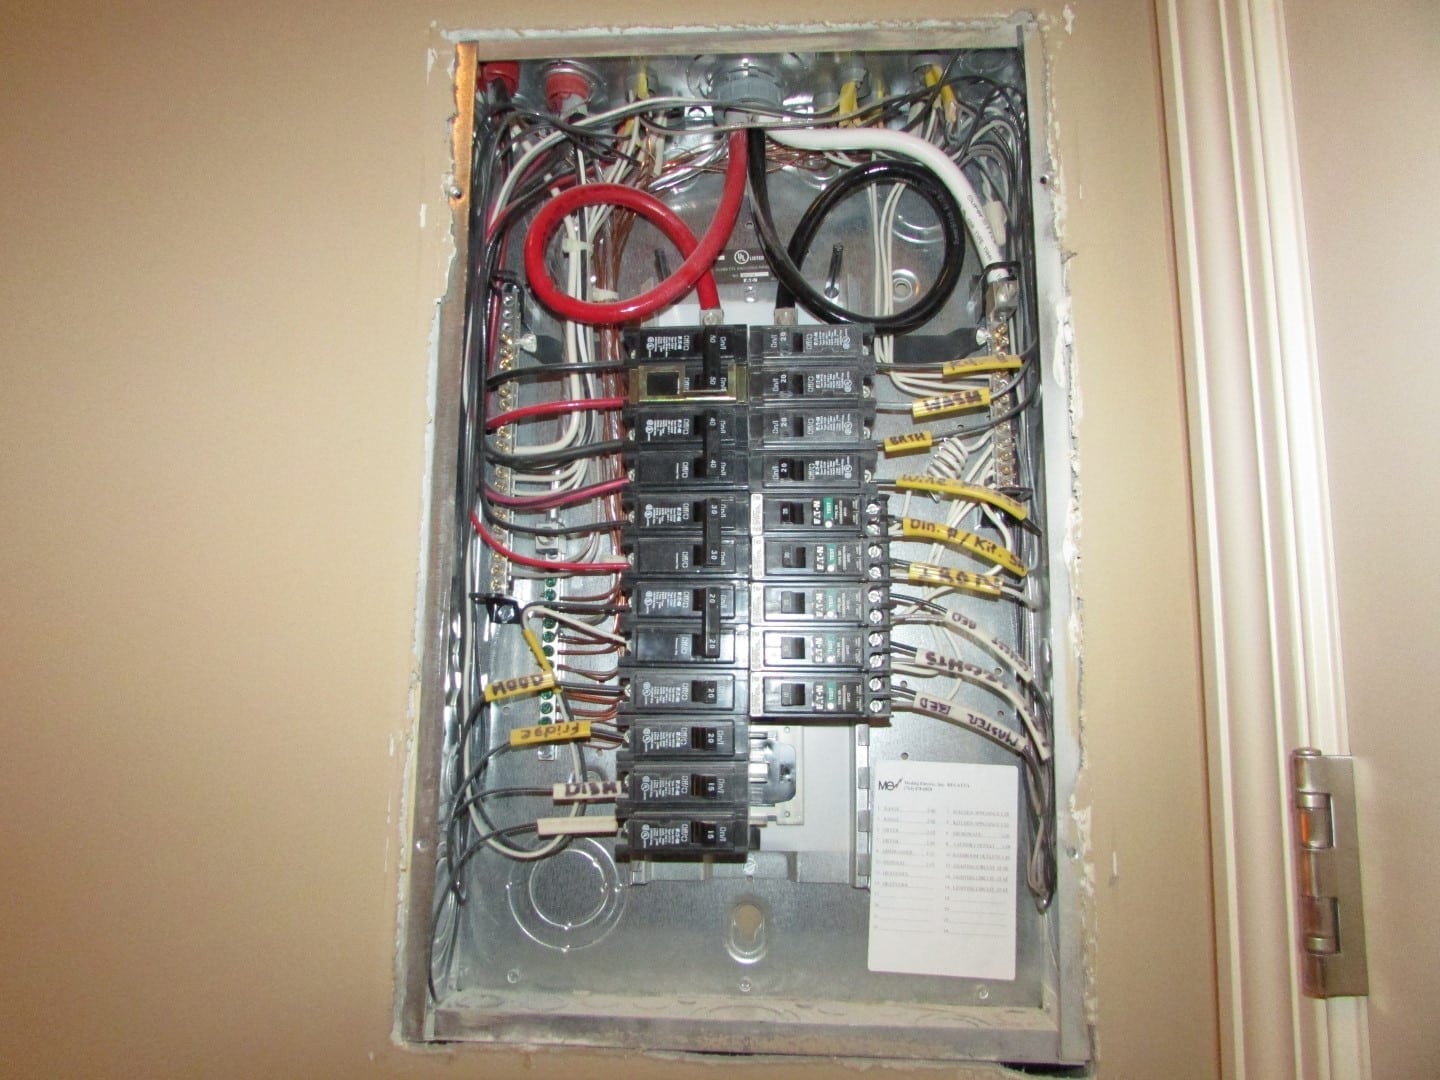
Once you determine the room or rooms on the circuit, return to the breaker panel and label the switch. How to map out, label your electrical/fuse panel. How this works is through the effects of current and power.
Make two equal quadrants between two street light poles. Electrical equipment must have a minimum 30” wide clear working space laterally in front of the equipment. It's best if the number sequence proceeds down the left side to the bottom and continues from the top right to the bottom right.
To determine the service meter base rating, contact a qualified inspector or electrician. Assign each circuit breaker a number inside the panel, starting with #1 at the top left. In electrical engineering, a circuit consists of a voltage source and a load, i.e.
After entering the required data from the nameplate, click on the “calculate” button to find out the number of poles. Upgrading from a 30/60 circuit panel to a 60/120 circuit electrical panel will increase the amount of room you have for additional circuits. Remove the breakers panel or cover.
This tag will also specify the maximum voltage and power the service meter is capable of handling. N/s=2 pole n/s/n/s=4 pole and so on. Steps to calculate your breaker panel’s total amps.
Open the electrical panel and look for the main circuit breaker. With the door open, you can access all the circuit breakers in the panel. Do this for each phase.
Determine every circuit breaker’s amp rating. The main circuit breaker can be turned off to stop power from reaching the home. Use a low voltage dc supply (enough to deflect the needle) across one phase.
@milesmeow you can use the multimeter to check continuity, but basically for testing the ground, you are measuring the resistance, so theoretically yes (but i think, practically, no). That usually makes the electricity come back. It stays within the main panel and goes to the circuit breakers that lead to each branch circuit;
Unplug all appliances connected to the circuit. Switch off all the circuits except one. This does not have to be centered on the equipment, but the electrical panel door must be openable to 90 degrees.
The working space can be shared among panels located adjacent to each other along a wall and need not be dedicated to a. Thanks for your electrical question stephen. When speaking about a building's electrical panel, the load is comprised of the dozen or so branch circuits leading from.
Where the power of the induction motor is constant, the torque increases at the rate that the speed decreases. Comparatively, a 60/120 circuit electrical panel has double that with 60 spaces for breakers. 2 how to tell if a circuit breaker is bad.
Get the amperage for the electric panel. How to determine the total electrical load of an electrical panel. More power demands a circuit increase, which means current needs.
The main panel has a circuit breaker that controls all the power to your home, this is the double pole service disconnect, this is also called the “main.” the electricity from the main can be wired in one of two different ways: The size or rating of the electrical panel is indicated on this breaker. Today we show you how to map out and label your electrical panel, also called the fuse panel, or fuse box.
To determine the number of poles, you can read the data plate directly or calculate it from the rpm stated on the data plate or you can count the coils and divide by 3 (poles per phase) or by 6 (pairs of poles per phase). It will alternate north/south as you go round.