How to remove wire insulation without cutting wire? For instance, if you're stripping.

4 Ways To Strip Wire - Wikihow
Slice into the insulation with a sharp blade.
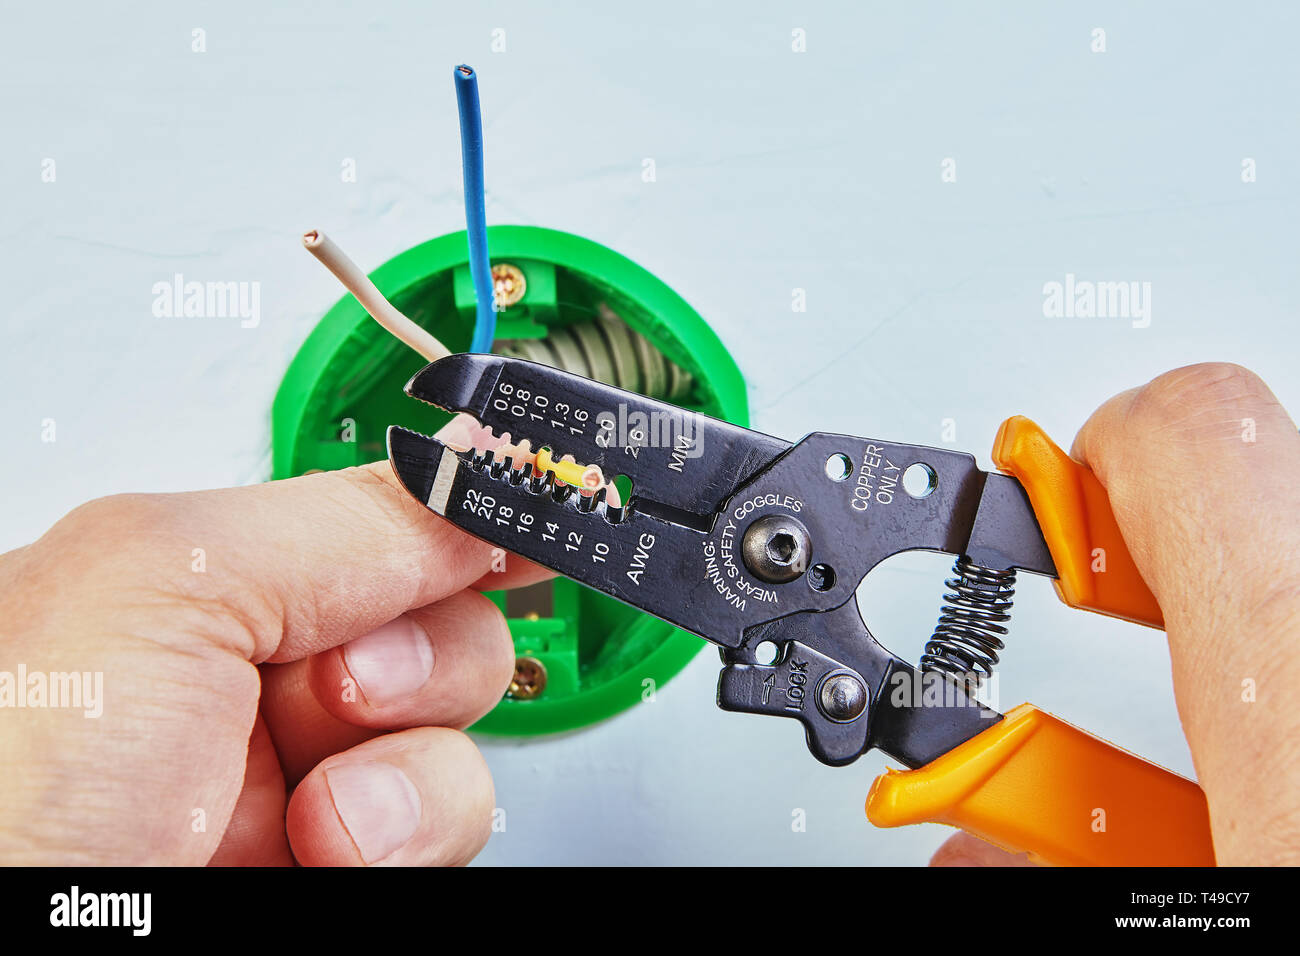
Stripping wire insulation. You probably have experience with utility knives, but be careful during. The first tool is a wire stripping tool. Aluminum wire must be stripped using extreme care, since individual strands break very easily after being nicked.
If this is found to be the case with any wiring, the circuit should be investigated and verified to be correct. Copper wire can be stripped in a number of ways depending on the size and insulation. Use a mounted vice or clamps to hold the wire.
Until recently, c&s machines did not have the ability to detect whether the insulation stripping blades have touched and have possibly damaged the underlying conductor. Electrical work can be very dangerous. This tutorial describes several different methods for removing the enamel insulation from magnet wire, which is commonly used to make solenoids and electro.
Align the wire with the notch that matches the wire gauge and squeeze to cut the insulation. Put on a pair of heavy gloves before you start to. Stripper 10013 for stripping wires insulation up to 10 kv.
It has cutoff blades and many formed stripping holes (notches) on each half of the tool. Figure 1 lists some types of stripping tools recommended for various wire sizes and types of insulation. Wire cutting and stripping (c&s) machines have been around for over 100 years.
The strip force of a wire varies with length of slug, wire size, insulation type, type of stranding and other variables, but it is typically in the range of 5 to 25 pounds (22 n to 111 n). Our safety blades mitigate your risk when you’re using a slice wire insulation stripping tool. Place one end of the wire in a vice.
Ceramic scissors (can easily slice thin copper wire gauges) 10568 ceramic scalpel (a tool with other applications aside from wire insulation stripping. A wire stripper can be in the form of sharp. If you see slices, cut off the cable and try again.
Make sure this fits by entering your model number. Starting with a large gauge first. Cable stripping knives can be invaluable when it comes to tasks such as wire stripping.
If you take care of them, they will last a lifetime. Wire stripping is essential to any project that is electrical in nature. It’s great for use if you’re working with wires at awkward angles or in tight spaces) these are some of the best cable strippers on the market.
We also make a line of ceramic scissors with the same blades that we use in all of our knives. This system was designed to remove coatings on enameled and magnet wires through an ablation process—replacing acid baths and other wire damaging processes. When stripping wires, you’ll need to find the correct slot.
The device allows you to remove insulation from small wires. Lasers can remove coating types, such as polyimide, urethane, lacquer, formvar, and others in just a few seconds. Before you can actually strip electrical wires, you'll need one of two tools to remove the insulation from the copper wire.
Stripping wire for scrap 1. It simply involves safe removal of the outer layer of insulation without impinging on the wires and other components beneath the insulation. Edge flash and smearing (as depicted) is considered normal, and should not contaminate or.
Wire stripping tools by klauke are equipped with innovative cutting edge features and special blade geometries. The easiest way to strip the enamel insulation off of magnet wire is to use an abrasive surface like sandpaper. Tutorial video for stripping insulation.
The wire strippers 43/2v and k43/2u are designed for cross section ranges of 0.08 mm2 to 16 mm2 and remove even complex insulating material efficiently and cleanly. If sandpaper is not available, other solutions like pinching the wire between two nail files will also work. Then hold the wire with one hand while you push the stripper with your thumb to remove the insulation.
Stripping quality control has been left to the judgement. Wire strippers cost less than $10. Wire manufacturers can control strip force within reasonable limits by careful control.
These scissors can easily cut thin gauges of copper wire, making them handy additions to your electrical tool belt. The following video demonstrates how to strip magnet wire: The slot should let the insulated wire fit snugly but not so much because you don’t want to remove the insulation.
Two co2 lasers are used to cleanly. Laser stripping coated metal wires. If you have a stripping tool, you can use it to remove insulation.
These holes have the different sized wires listed for you. Even sheathing material out of silicon or hard insulating substances. You’ll notice multiple notches for.
Post a question or comment about how to install and wire electrical outlets or receptacles in buildings. Fortunately, they are also affordable. Another way to identify the gauge of the wire conductor is to examine a spare piece of the wire of the same size and using a good wire stripping tool to remove the insulation.
The maximum force reached during stripping is measured and recorded. If you were to strip it, your 75lbs of copper would bring you $1.90 per pound $142.50 the difference between stripping and selling it the way it was would be $12.50. That way, you'll be able to use.
Electrical wire insulation stripping procedure how to properly remove insulation from electrical wires when making connections to devices.
Stranded wire construction is favored, instead. On paper what is the length of a 14awg copper wire?

Buyme 10Meters Varnished Wire J439B 0.1Mm Diameter Thin Copper Wire Diy Rotor Enamelled Wire Diy Electromagnet Technology Making Super : Amazon.in: Home Improvement
Copper has been used in electrical wiring since the invention of the electromagnet and the telegraph in the 1820s.

Copper wire short image. If the wires become loose or there is a massive electricity surge, your copper wires may become black. Pennies were made of pure copper only from 1783 to 1837. Add 1 tablespoon (17.06 g) salt and 1 cup (236.58 ml) vinegar to a bowl.
A short circuit occurs when the current finds a way to bypass the appliance. Overheating is another reason your copper wire may have turned black. And you can make it any size to fit the wall where you plan to hang it.
The colors white and gray indicate a neutral wire. 15% of the grade are to explain each step and formula used The addition of copper to gold is how red gold or rose gold is made.
Dc resistance at 20 deg.c short circuit current for 1 second aluminium copper aluminium copper mm2 mm ohms/kms ohms/kms ka ka 95 11.25 0.3200 0.1930 8.93 13.58 Twisted pair is the ordinary copper wire that connects home and many business computers to the telephone company. Mix the solution together until the salt is well incorporated with the vinegar.
Area (in) (mm) (per in) (per cm) (kcmil) (mm 2) 0000 (4/0) 0.4600: In 1857, the amount of copper. Microstructures of copper and copper alloys.
This feature is important not only from an economic standpoint, but also from the standpoint of safety and reliability. Turns of wire, no insulation: In the first step the initial wires, which can be wire rod, are covered with a.
Photos illustrations vectors videos audio templates free premium fonts. The bundle wire drawing is another mechanical steel fiber production process where thousands of conventional drawn wires are bundled and drawn simultaneously [16].the company nv bekaert sa has an actual patent on this process. The following table of wire sizes does not show any sizes bigger than 4/0 gauge, because solid copper wire becomes impractical to handle at those sizes.
This is copper or aluminum wire with a thin insulation to prevent short circuits. Even the copper wire becomes warm. 10.4 shows the basic principle of the bundle wire drawing process.
Once power leaves the electrical panel through the hot wire of a circuit and works through devices such as a light bulb or an outlet, the electrical current returns back to the service panel. Salt and vinegar can help clean off any tarnish or corrosion that remains on your copper wire. Copper is the electrical conductor in many categories of electrical wiring.
8000 bce) as a substitute for stone by neolithic (new stone age) humans. This section displays photo micrographs of commercially important and/or metallurgically interesting copper and copper alloys and processings. Every such appliance has a certain amount of resistance to the current flow, which keeps the current from reaching very large values.
Copper wire is used in power generation, power transmission, power distribution, teleco… Copper is found in the free metallic state in nature. To meet the immense variety of uses and to gain competitive advantage, a great number of kinds of enamel.
What is the length of a 14awg copper wire? Problem 3 what is the length of a 14awg copper wire? Often, the fact that a copper downlead has
To view each alloy group, simply click on the links below: In a normal electric circuit, an electric current powers an appliance, such as a refrigerator or tv. Kcmil = circular mils x 1000.
Single core and multicore cables with copper or aluminium conductor, xlpe insulated and pvc sheathed. Cables are rated at 0.6 / 1 (1.2) kv and conformed to iec 60502, ms 2104 & ms 2106. Construction 1 conductor plain circular, compacted or shaped stranded copper or aluminium conductor, conform to iec 60228 class 2.
Please explain each step and formula used. It is also the oldest metal known to man and was first discovered and used about 10,000 years ago. Cuprum) and atomic number 29.
Copper is a chemical element with the symbol cu (from latin: Copper (cu), chemical element, a reddish, extremely ductile metal of group 11 (ib) of the periodic table that is an unusually good conductor of electricity and heat. When dsa copperclad wire is used in place of copper, the grounding conductor is far less likely to be stolen.
White and gray electrical wires. Copper & high copper alloys. Hang your photos in style with this super cool copper photo display.
Featuring over 68,000,000 vector clip art images, clipart pictures and clipart graphic images. Photos illustrations vectors videos audio templates free premium fonts. This native copper was first used (c.
From 1837 — 1857 pennies were made of bronze (95% copper, with the remaining 5% made up of tin and zinc). It is found in ore deposits around the world. Copper is a major metal and an essential element used by man.
Download copper wire on metallic surface stock photo and explore similar images at adobe stock. Metallurgy dawned in mesopotamia as copper was cast. Attach your favorite photos to copper wire with tiny clothespins to create a unique wall hanging that will be much cheaper than buying lots of frames.
Copper was the first metal to be worked by man, along with gold and meteoritic iron. The invention of the telephone in 1876 created further demand for copper wire as an electrical conductor. You should use magnet wire.
Copper wire turns black from over heating. That means it connects to an electrical panel’s neutral bus bar.
Do not enlarge or distort the port. Do not wash burner caps in the dishwasher.

Amazon.com: Kitchenaid 30" Stainless Steel 5-Burner Gas Cooktop Kcgs550Ess : Appliances
This type of ventilation system may cause ignition and combustion problems with this gas cooking appliance resulting in personal injury or unintended.

Kitchenaid gas cooktop ignition wire burned. If a gas leak is detected, follow the “what to do if you smell gas” instructions. Usually, this is a problem that can be solved with cleaning. Should you notice sparks from your electric unit, you definitely need to make some repairs.
Disconnect all the wires attached to the spark module. When the cooktop lock activates, the cooktop lock indicator light will turn on and one. If playback doesn't begin shortly, try restarting your device.
The cooktop lock feature helps control the unintended use of the surface burners. An electric cooktop should not spark the same way that a gas cooktop does before it’s lit. Remove the bushings from the stems of the burner control valves.
Before removing the burner cap or burner base, make sure the gas stove top is cool to the touch and the appliance is unplugged. Videos you watch may be added to the tv's watch history and influence tv recommendations. The burner base and the underside of the burner cap may have a mark indicating which burner cap and burner base match as shown below.
In some models, you will also need to remove the igniter electrode that is built into the burner head. Remove the burner cap and burner base. Burner cap should fit flush with burner base and have very little side to side movement.
Turn off all burners and touch the lock key for 3 seconds. Do not clean in the dishwasher. The indicator light will turn off, and one long tone will sound.
When the cooktop lock activates, the cooktop. Spark ignition switch wire harness for kitchenaid kfgu766vss04 cooktop. Gas cooktop use and care guide for questions about features, operation/performance, parts, accessories or service, call:
Making sure the alignment pins (if present) are properly aligned with the burner cap as shown below. Cooktop creates sparks when turned on. For some burner bases, you may need a screwdriver to remove the screws.
Gas burners and ignition for your kitchenaid cooktop. Serving only this cooktop be provided. However, when food or other debris burn up in a gas flame, it changes the color to yellow, orange, or red.
This type of ventilation system may cause ignition and combustion problems with this gas cooking appliance resulting in personal injury or unintended. Always keep the burner cap in place when using a surface burner. A clean burner cap, especially the bottom of the cap, will help avoid poor ignition and uneven flames.
Click here for a video about how to properly position your gas burners and bases. Remove the switch and harness assembly from the cooktop and discard it. Touch the lock key for 3 seconds.
If a control knob is turned to lite when the cooktop lock is on, you will hear clicking and you may see the igniter sparking, but the burner will not light. Common induction operating sounds using correct cookware. Some of these conditions are dangerous.
Electronic ignition systems operat e within wide voltage limits, but proper grounding and ipolarity are necessary. To activate the cooktop lock: This article explains the cause, diagnosis, and cure of cooktop or gas range igniter problems that cause continuous clicking, or failure to ignite gas burners or a gas oven properly.
Gas cook top igniter diagnosis: Do not use a wooden toothpick; Spark ignition switch wire harness for kitchenaid kfgu766vss04 cooktop.
Clean the gas tube opening under the base. The wiring diagrams lpare provided with this cooktop. Doing so may result in carbon.
The cooktop is easiest to clean as soon as the top, grates and caps are cool following cooking. To deactivate the cooktop lock: To remove the burner head for cleaning, you simply need to unscrew the mounting screws and remove it.
Then, simply remove the grates and lift the cap off of the burner. Before removing your burner head, you will want to shut off the gas to your stove and disconnect it from its electrical source for safety. Watch the following video to learn about your gas surface burners:
Gas burner flames are too high or low, uneven, flickering, yellow, or noisy on your kitchenaid cooktop. If the wire harness and switches are one component, as on this model, remove all. Never use this appliance as a space heater to heat or warm the room.
The gas igniter troubles discussed here apply to some models of gas appliances including gas stoves, gas ovens, and gas cooktops. If your gas burner flames are not normal, check to make sure the burner ports are clean. Turn off all burners and touch the lock key for 3 seconds.
Models/modèles kgrs807 kgsk901 kgss907 w10246109b gas range architect® series ii use & care guide for questions about features, operation/performance, parts, accessories or service, call: Do not install a ventilation system that blows air downward toward this gas cooking appliance. Genuine product, whirlpool manufactured the original product for your kitchena.
Click here for a video about properly cleaning your gas surface burners. The final issue that can occur with the flame on your gas stove is that the flame will be yellow instead of blue. Pull the spark igniter switches off of the burner control valves.
Table de cuisson au gaz guide d’utilisation et d’entretien Do not install a ventilation system that blows air downward toward this gas cooking appliance. Always clean the burner cap after a spillover and routinely remove and clean the caps.
Clean with a nonabrasive plastic scrubbing pad and mildly abrasive cleaner. Electric ignition on your kitchenaid gas cooktop. Do not use a wooden toothpick, it can break off and prevent proper gas flow.
If a gas leak is detected, follow the “what to do if you smell gas” instructions. To reduce the risk of fire, electrical shock, injury to persons, or damage when using the cooktop, follow basic precautions, including the following: Genuine product, whirlpool manufactured the original product for your kitchenaid kfgu766vss04.
If your electric cooktop produces sparks, there may be damage to its heating element. Its possibly one of the burner switches came out of place, remove all the knobs and get a flashlight and see if they are all aligned with the valve stem properly.
When two devices are added to the box, subtract three wires in. If you need to turn off the electricity that goes to the shed, the wire underground outside the house will not be energized.
Install Electric Outlet In Backyard Shed | Icreatables.com
A total capacity of 34.3 cubic inches allows for 16 #14 gauge wires, 15 #12 gauge wires, or 13 #10 gauge wires.

How to wire a wooden box with an electrical outlet. With one device added to the box, subtract two wires in each category. A quick and easy way to install electrical outlet boxesmore mastered in a minute videos: When obtaining the romex wire, determine the path of the wire and the distance from the new outlet to the electrical source, and then add 12 inches for each point of connection.
Create a hole for your outlet box. Make sure you have a snake or fish tape long enough to go from end to end. Best way to install an electrical box in an existing walltoday vince shows you how to install an electrical box in an existing wall for moving the outlet or.
Run wire in emt (electric metallic tubing) cut emt & tie wiring into existing power. Keep in mind that you can’t run more than 20a at once from single outlet due to switch rating (power = voltage x current). Install a circuit breaker on the wiring of the main electrical box.
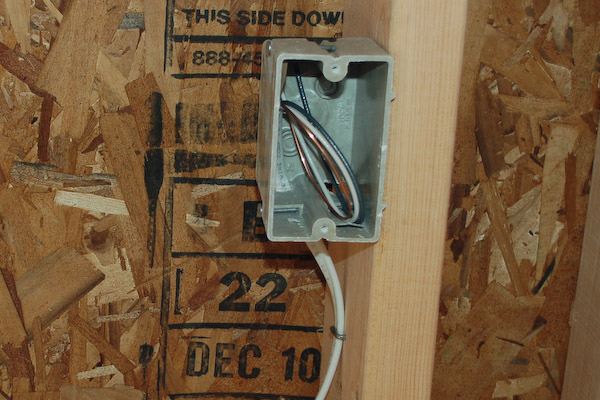
Layout the pipe run adjacent to the trench. Push the box into the hole and ensure everything is snug how we like it! Push the conductors and about 1/4 inch of sheathed cable into the box and staple the cable within 8 inches of the box.
Tighten all the screws to hold the wires in place, then attach the subpanel cover. How to wire a shed for electricity: Make sure the cable clamp is holding all the wires securely in place.
In a system with metal boxes, the pigtail method is considered the most secure. If you damaged the wall around the box, use an oversize cover plate to hide the problem. Versión en español i found myself in need to move my noisy woodworking to my back yard to avoid waking up my lady who works night shift.
Use a keyhole or drywall saw to cut out the shape. Connect the neutral and ground to the brass terminal and ground terminal respectively. The grounding wire nut shown has a hole in its top that makes installing a pigtail easier.
A rotary hammer drill fitted with a carbide tipped drill makes an excellent tool, but if this isn't available, a star drill will work. In this arrangement both the receptacle and metal box are grounded. Glue or fasten the pipe together with approved fittings and adhesives.
Ground wires are spliced together and attached with a pigtail to the box and receptacle. For junction boxes installed on the ceiling, run the cable from the ceiling down into the box. Fasten the cable using a wire staple within 12 inches (30 cm) of the box to secure it.
Here’s how to install an electrical box without a stud using a winged remodel box: Trace a line to give a guide for breaking the block. Feed through enough cable to reach the new box plus an extra foot.
Mount the handy box in the desired location. Using a drywall keyhole saw, carefully cut the hole along the traced outline and remove. Feed new cable into the wall.
Position the electrical box backward against the wall, in the exact position you plan to install it. Thread the cables into the box and secure them. To do this, connect line 1 and line 2 to the lower hot terminals respectively.
If you're mounting it on a concrete, cement block, or brick wall, you will need to drill the wall using the appropriate size masonry bit (the one that came with the plastic anchor kit), drive in the plastic anchors, and screw the box to the anchors. Punch a hole (or two for two cables) through the knockout area of the box with a screwdriver or the point on your stripping tool. Break out the brick along the outline that you made using a cold chisel and a hammer.
Take a pencil and trace the outline of the box on the wall, avoiding the box's ears. use a utility knife to score the wall along the shape you outlined. Position the handy box & find appropriate fasteners. Drill holes at the corners of your outline and then use a ball peen hammer to break away the rest of the concrete.
Bring the wire to this location either by drilling up from underneath the floor, inserting the wire from the other side of the wall or running a metal conduit. I decided to wire my shed and after some homework and the help of the instructables community i s…. To wire the interior outlet, connect all the hot wires (black and any other color except green or white), all the neutral wires (white) and all the ground wires (green or bare copper.
The switch should be inside the house for safety reasons. Trace the outline of the box onto the wall. In this article, we will take a close look at the intricacies involved in.
Strip the wires with wire strippers. Start with one wire and strip off 3⁄4 inch (19 mm) of casing insulation at the end. Gently fold the wires into the box, then reattach the outlet and cover plate.
Also you will be able to turn off the electricity when you leave for vacation. Connect the red and black wires to the two screws on the hot bus strip of the subpanel. Attach an appropriate emt termination.